Meta Description: Thinking of moving your WP site to a new server? Our friendly guide walks you through the process, from prep and backup to the final go-live checklist.
Relocating your WordPress site might sound like a huge technical chore, but it’s really a strategic upgrade for your digital home. The process involves backing up your files and database, moving them over to a new host, and then updating your domain settings to point to the new location. When you get it right, it’s a fantastic way to boost your site's speed, tighten up security, and give your visitors a much better experience.
Why Moving Your WordPress Site Is a Smart Upgrade
The idea of moving a whole WordPress site can feel a bit intimidating, a bit like packing up your entire house. But just like moving to a better neighbourhood, migrating your website to a new server is one of the most significant upgrades you can make for its long-term health and success. This isn’t just about changing servers; it's a forward-thinking move for growth.
Think of your current web server as your site's home. When you first started, a basic, shared space was probably all you needed. It did the job. But as your traffic has grown and you've added more content, that space can start to feel cramped. Pages begin to load slowly, performance takes a nosedive during peak times, and you might start having nagging doubts about security.
Spotting the Signs It's Time to Move
The first step is recognising that you've simply outgrown your current hosting. If you're thinking about moving your WP site to a new server, it's probably for one of these classic reasons:
- Your site is getting sluggish: As you get more popular, a standard shared hosting plan often can't keep up. The result? Slow load times that send visitors bouncing away.
- You need better security: A growing business handles valuable data and can't afford to rely on basic security. You need something more robust to protect your site and your customers.
- You're expanding your audience: If your main audience is in the UK, hosting your site on a local server can make a massive difference to their experience, slashing load times.
- Your current provider's support is lacking: If you're left waiting hours—or even days—for a response to a critical problem, that's a massive red flag. It's time to move on.
The Big Picture: A Positive Investment
Changing your site's digital address is really about setting it up for future success. A better server gives you a much stronger foundation, which translates into tangible benefits like faster page speeds, better SEO rankings, and a more dependable experience for your audience. Suddenly, the migration stops feeling like a chore and starts looking like a smart investment.
The UK's digital space is always evolving. For instance, the number of live WordPress sites in the UK dropped from over 1.4 million to roughly 959,933 between 2023 and 2025. This shows that businesses are constantly assessing their hosting and platform choices to find the best possible fit. A well-planned migration ensures your site stays competitive and resilient. You can get a better sense of these shifts by looking at the latest WordPress statistics in the UK.
By looking at it differently, you realise that moving your WordPress site isn't about running from a bad situation—it's about stepping into a much better one. It’s your chance to level up performance, tighten security, and give your visitors the slick experience they deserve.
At the end of the day, this move allows your website to handle more traffic, climb higher in search results, and turn more visitors into loyal customers. It’s a decision that keeps paying dividends long after the technical bits are finished.
Your Pre-Migration Prep for a Seamless Transfer
Any successful website move I've ever handled started with solid prep work. Think of it as your pre-flight checklist; it’s all about getting your ducks in a row before you even dream of touching a file. A little time spent here saves you from a world of headaches later on.
This whole stage is designed to build your confidence for moving your WP site to a new server. We'll walk through the essentials in plain English, so you feel completely ready for a smooth switch.
Choosing Your New Digital Home
First things first: you need to pick your new hosting provider. This is arguably the most critical decision you'll make, as it directly affects your site's speed, security, and overall reliability. It's worth putting in the research.
If your audience is primarily based in the UK, I'd strongly recommend choosing a provider with UK-based servers. Hosting your site locally cuts down on latency—that's the time it takes data to travel from the server to your visitor's screen. A faster load time makes a real difference to your user experience and can even give your local SEO a nice little boost. When you’re weighing up your options, our guide on seamless https://linxrepairwebsites.com/hosting-migration/ offers some extra tips to help you find the right partner.
Gathering Your Keys and Tools
Before you can start the move, you need to collect the "keys" to your current website. This just means getting all your login details together in one place.
You'll absolutely need:
- FTP/SFTP Credentials: This includes your hostname, username, password, and port number. It’s how you’ll get direct access to your website's files.
- Database Login Info: Take a look inside your
wp-config.phpfile. You're looking for the database name (DB_NAME), username (DB_USER), and password (DB_PASSWORD). This is vital for moving all your posts, pages, and settings. - Hosting Control Panel Login: You'll need access to your current cPanel, Plesk, or whatever custom dashboard your host uses to manage backups and databases.
Pop these details somewhere safe and easy to find. Trust me, having them handy will make the whole process run like clockwork.
Deciding Your Migration Path: Plugin vs Manual
When it comes to the actual move, you've got two main routes: go manual, or let a plugin do the heavy lifting. There's no right or wrong answer here—it all boils down to your comfort level with the technical side of WordPress.
A manual migration gives you total control but does require a bit of familiarity with tools like an FTP client (I use FileZilla) and a database management tool like phpMyAdmin. On the flip side, a plugin automates almost everything, which is a fantastic choice if you're not keen on getting your hands dirty with code and server settings.
Choosing your method is about balancing control with convenience. A manual move is like driving a manual car—you have more direct control over every gear shift. Using a plugin is like driving an automatic—it handles the complex parts for you, letting you focus on the destination.
So, how do you decide which path is right for you? Thinking about the trade-offs between a plugin-based and a manual approach is a great place to start. Each has its pros and cons depending on your technical skills and how much control you want over the process.
Choosing Your Migration Method Plugin vs Manual
| Feature | Plugin-Based Migration (e.g., Duplicator) | Manual Migration (FTP & phpMyAdmin) |
|---|---|---|
| Ease of Use | Very user-friendly; often just a few clicks. Ideal if you're not a developer. | Requires technical knowledge and can feel complex if you're not used to it. |
| Time Investment | Much faster. The automation handles the time-consuming parts for you. | Can be quite slow, especially with larger websites or slow connections. |
| Control | Less direct control over the process; you trust the plugin to do its job. | You have 100% control over every single file and database table. |
| Best For | Beginners, or anyone who just wants a quick and simple move without the fuss. | Developers, tech-savvy users, and anyone who wants granular control. |
If you go the plugin route, popular and reliable options like Duplicator or All-in-One WP Migration are excellent choices. They neatly bundle your entire site into a single package, making the transfer incredibly straightforward.
By thinking through these prep steps now, you’re setting the stage for a migration that's as stress-free as possible.
The Core Migration Process: Your Files and Database
Right, this is where the real work begins. Moving a WordPress site boils down to two key components: the files (themes, plugins, uploads) and the database (all your content and settings). Think of it like moving house; you have the furniture and the box of important documents. Both need to be handled carefully.
We're going to walk through this step-by-step, so don't feel overwhelmed. Let's get hands-on with moving your WP site to a new server.
Your Absolute First Step: A Full Backup
Before you touch a single thing, you need a complete backup of your site. I can't stress this enough. This is your safety net, your undo button. If something goes sideways, this backup will save you from a world of headaches.
You've got a couple of solid options here:
- Hosting Provider Backup: The easiest route is often through your hosting dashboard. Most providers offer a one-click backup tool in cPanel or their custom control panel. Look for an option to generate a full site backup, which typically bundles everything into a
.zipfile for you. - Manual Backup: For more control, you can do it yourself. This involves using an FTP client like FileZilla to download all your website folders and files, then using a tool called phpMyAdmin to export your database. It's a great skill to have in your back pocket.
Whichever path you take, download the backup files to your computer and store them somewhere safe. You now have a perfect snapshot of your site before the move.
The following infographic highlights what to look for when choosing your new hosting provider, centring on features, resources, and performance.
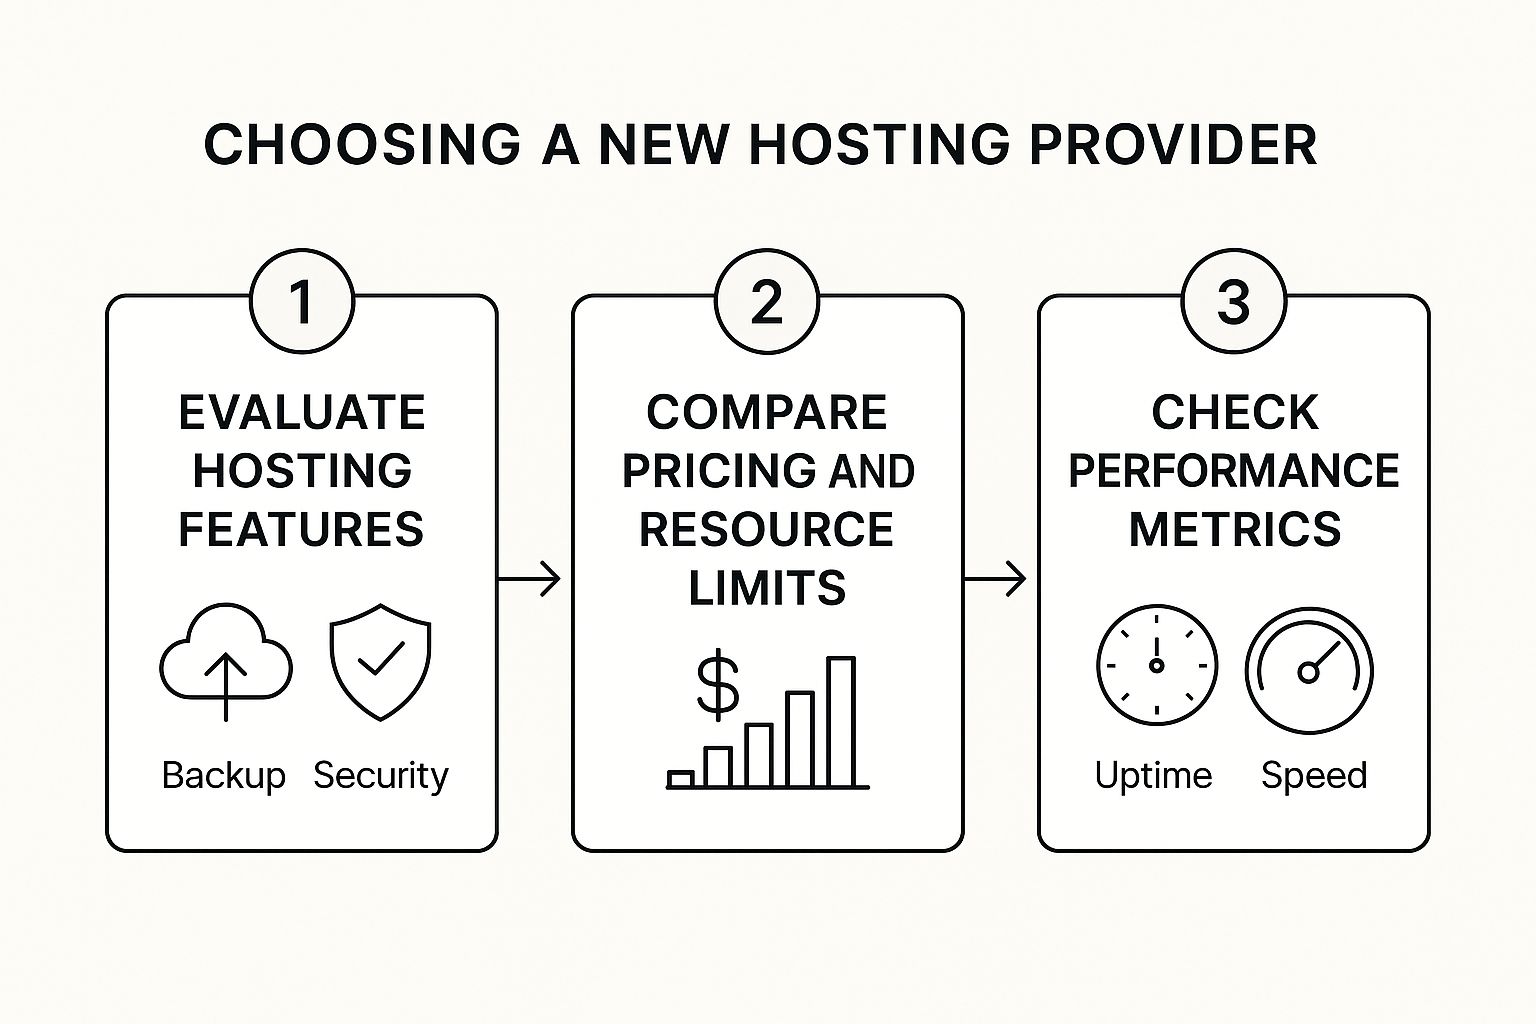
This visual guide reinforces that selecting a new host is a structured process. You need to evaluate features, compare costs, and verify performance to ensure your new server can handle what you throw at it.
Moving Your Website Files
With your backup safely tucked away, it's time to shift the files. We're talking about the core structure of your site: the wp-content, wp-admin, and wp-includes folders, along with files like wp-config.php.
The most reliable tool for this job is an FTP (File Transfer Protocol) client. FileZilla is a fantastic, free option if you don't already have a favourite.
First, you'll need to connect to your new server using the FTP credentials your new host provided. Once you're in, find your website's root directory – it’s usually called public_html or www. This is the new home for your files.
Now, simply drag all your WordPress files from your computer (the local view in your FTP client) over to the empty root directory on the new server. This can take a while, especially if you have years of images and uploads. It's the perfect excuse to go and make a cup of tea. Just let it run.
Tackling the Database Migration
The database is the brain of your website. It holds every post, page, user comment, and plugin setting. Getting this part right is absolutely critical. We'll use phpMyAdmin, a standard tool found in nearly every hosting control panel.
Getting the Database Out
First, you need to export the database from your old server.
- Log in to your old host's control panel and open phpMyAdmin.
- On the left, select the database for your WordPress site. (If you're unsure of the name, peek inside your
wp-config.phpfile and look for theDB_NAMEvalue). - Click the "Export" tab at the top.
- The "Quick" export method is usually all you need. Just make sure the format is set to "SQL".
- Click "Go". A
.sqlfile containing your entire database will download to your computer.
My Pro Tip: As you create your new database, jot down the new database name, username, and password. You'll need them in the final step to tell WordPress where to find its new home.
Getting the Database In
Before you can import your data, you need to prepare a new, empty database on your new server.
- In your new host's control panel, find the "MySQL Databases" or similar tool.
- Create a brand new database with a recognisable name.
- Create a new database user and give it a strong, secure password.
- The crucial last step: add the new user to the new database and grant it "All Privileges". It's a common mistake to miss this, but without it, WordPress can't talk to the database.
Now, open phpMyAdmin on your new server, select your empty database, click the "Import" tab, and upload the .sql file you downloaded earlier. Once the import completes, your content has officially arrived at its new home.
The Final Connection: The wp-config.php File
There's one last, vital piece of the puzzle. Your WordPress files don't know about the new database yet. We need to update the connection details in the wp-config.php file.
You can edit this file using your new host's File Manager or by downloading it via FTP, making the changes, and re-uploading it. Open the file and find these lines:
define( 'DB_NAME', 'old_database_name' );
define( 'DB_USER', 'old_database_user' );
define( 'DB_PASSWORD', 'old_database_password' );
define( 'DB_HOST', 'localhost' );
Carefully replace the old values with the new database name, username, and password you just created. The DB_HOST is almost always 'localhost', but it's worth double-checking your new host's documentation just in case.
Save the file, and that's it! Your files and database are now on the new server and know how to communicate with each other. The heavy lifting of moving your WP site to a new server is done.
If you hit a snag or would rather have an expert handle it, feel free to contact us to learn more about our migration services.
Final Checks for a Flawless Launch

You’ve made it through the heavy lifting. The files are moved, the database is in its new home, and your wp-config.php file is pointing to the right place. That's a huge milestone!
Now, we’re on the home stretch. Think of this last part as the final quality check before you officially open the doors to your site's new location. These checks are all about making sure your visitors have a perfect experience from the moment they arrive.
Pointing Your Domain to Its New Home
The first real step in going live is telling the internet where your website now lives. This involves updating your domain’s DNS settings. Don't let the acronym scare you; it’s a pretty simple concept.
The DNS (Domain Name System) is basically the internet's address book. When someone types your domain (yourwebsite.co.uk) into their browser, DNS looks it up to find the server's IP address. Right now, it's still pointing to your old server. We just need to change that entry.
You’ll handle this wherever you manage your domain—usually your domain registrar, like GoDaddy or Namecheap. Your new hosting provider will give you their nameservers. All you have to do is log into your registrar's dashboard and swap the old ones for the new ones.
This update isn't instant. The change can take anywhere from a few minutes to 48 hours to spread across the globe, a process called propagation. So, don't panic if your site doesn't appear on the new server right away.
Your Final Launch Checklist
Once the DNS has fully propagated, it's time for a thorough walk-through of your live site. This is where you get to put on your visitor hat and make sure everything is spot-on.
Grab a notepad (digital or physical) and run through this list:
- Links, Internal and External: Click through your main navigation, footer links, and a few links within your pages and posts. You're hunting for any that lead to a 404 "not found" error.
- Forms and Functionality: Test every single form. This means your contact form, newsletter sign-ups, quote requests—everything. Make sure the submissions actually land in your inbox.
- eCommerce Checkout: If you're running a WooCommerce store, this is non-negotiable. Do a full test order. Add a product to the cart, go through the entire checkout, and confirm the payment gateway works and order emails are sent.
- Images and Media: Quickly scroll through your key pages. Do all the images, videos, and downloadable files load correctly?
Essential Housekeeping
With the front-end confirmed as solid, there are a couple of quick but vital admin tasks to sort out in your WordPress dashboard. Skipping these is a common source of post-migration headaches.
First up, clear your website's cache. Your caching plugin and server might be stubbornly holding onto old versions of your pages. Purging the cache ensures everyone sees the fresh version of your site from its new server.
Next, it’s absolutely crucial to reset your permalinks. This simple trick can fix a whole host of baffling 404 errors that sometimes pop up after a move.
- Log into your WordPress admin area.
- Navigate to Settings > Permalinks.
- You don’t have to change a thing. Just click the Save Changes button.
That’s it. This one click forces WordPress to rebuild its .htaccess file, which manages your site's URL structure. It’s a tiny action that solves a lot of potential problems.
Taking a few minutes for these checks gives you peace of mind that all your hard work has paid off. Your website is now settled into a faster, more reliable home. For UK businesses, this often means a significant performance boost. Recent data shows server-side upgrades like PHP 8.2 have improved WordPress site speeds by 37%. You can find more insights on WordPress performance in the UK.
If you’ve followed these steps and are still hitting a wall, don't worry. Sometimes a fresh pair of expert eyes is all you need. Contact us to learn more, and we’ll be happy to help make sure your launch is a complete success.
Sorting Out Common Migration Problems
Even when you follow every step to the letter, a website migration can sometimes throw a spanner in the works. It’s perfectly normal, so don't panic. Most issues that crop up after a move look a lot worse than they actually are, and the fixes are usually quite simple.
Think of this as your post-migration first-aid kit. We’ll go through the most common headaches you might encounter after moving your WP site to a new server and show you how to get things running smoothly again.
The Dreaded White Screen of Death
So, you’ve finished the migration, you eagerly type in your URL, and… nothing. Just a stark, blank white screen. This is what we call the "White Screen of Death" (WSoD), and more often than not, it’s a sign of a plugin or theme throwing a wobbly on the new server.
Your first port of call is to disable your plugins. Since you probably can’t get into the admin dashboard, you'll need to use FTP or your host's file manager. Navigate to the wp-content folder and just rename the plugins directory to something like plugins_old. This forces WordPress to deactivate everything.
If your site springs back to life, you've found your culprit. Rename the folder back to plugins and then reactivate them one by one in the admin area until you find the troublemaker. Sometimes, this kind of conflict can also trigger a more direct error message; if so, understanding the common causes of a WordPress fatal error can give you a better idea of what's happening under the bonnet.
Error Establishing a Database Connection
This one sounds technical, but it’s actually telling you exactly what’s wrong: WordPress can’t find or talk to your database. I’d say 99% of the time, this points directly to a simple mistake in your wp-config.php file.
It's an incredibly easy slip-up to make, especially during a manual migration.
- Check your credentials: Open up your
wp-config.phpfile and carefully inspect the details. Make sure theDB_NAME,DB_USER, andDB_PASSWORDare an exact match for the new database you set up. - Confirm the DB_HOST: It’s usually
localhost, but some hosting companies use a specific server address for their databases. It's always worth double-checking this with your new host's support docs.
A single typo is all it takes to sever this connection. A thorough check almost always gets this sorted in minutes.
Mixed Content Warnings After the Move
You’ve done it, the site is live on the new server, but your browser is flashing a "not secure" warning next to your domain. This is a classic mixed content issue. It means your main page is loading securely over HTTPS, but some of your assets—images, CSS files, or scripts—are still being called from the old, insecure HTTP address.
This is a common hangover from your old server's setup. The old
http://URLs are hard-coded in your database and need updating tohttps://to reflect your new, secure environment.
The quickest fix is to use a plugin like Really Simple SSL, which handles this for you. Alternatively, you can run a search-and-replace on your database to update every instance of your old URL. This ensures every last resource loads securely, bringing back that reassuring padlock icon for your visitors.
Knowing what to look for makes the whole process of moving your WP site to a new server far less daunting. And remember, if you really get stuck, expert help is never far away.
The Advantage of a UK-Based Server
When you’re going through the effort of moving your WP site to a new server, it's easy to get bogged down in technical specs like storage space and memory. But there’s another factor that can make a massive difference, especially if your audience is primarily in Britain: the physical location of your server.
https://www.youtube.com/embed/yUCadElwXa4
Choosing a UK-based host might seem like a small detail, but it has a surprisingly big impact. Think of it like a local shop versus one on the other side of the world. For your UK visitors, a local server means data doesn't have to travel across oceans just to load on their screen. This directly translates to faster loading speeds—a huge win for both keeping visitors happy and giving your local SEO a healthy boost.
Faster Speeds and Better Rankings
Imagine a user in London visiting your site. If your server is in, say, Texas, the data has a long journey to make. Even with today's fast networks, that physical distance introduces a small but noticeable delay known as latency.
By hosting your website right here in the UK, you slash that travel time for your local audience. Milliseconds really do matter online. A snappier, more responsive website not only feels better to use but is also a key signal that search engines like Google pay close attention to when ranking sites for local searches.
Data Sovereignty and Building Trust
In our increasingly data-conscious world, where and how you store customer information is a very big deal. Opting for UK-based hosting offers some real, tangible benefits when it comes to data sovereignty and regulatory compliance.
This is particularly true with GDPR. Keeping your customer data within the UK helps ensure you’re meeting these strict standards, which is a major concern for any business that handles sensitive information. This isn't just about reducing legal risks; it's about building trust. Customers are far more likely to feel secure when they know their data is being handled locally and responsibly. You can find more insights about UK hosting and data compliance on bluehost.com.
Choosing a local server isn't just about speed; it's a clear statement to your users that you value their data privacy and are committed to keeping it secure within the UK's regulatory framework.
Support in Your Time Zone
Finally, there’s a simple, practical benefit that’s often overlooked: customer support. When something goes wrong at 10 AM on a Tuesday, the last thing you want is to wait for a support team in a completely different time zone to start their day.
Having access to a UK-based support team means you get help when you actually need it, from people who understand the local market. This can be an absolute lifesaver during a migration or if you run into any unexpected issues down the line. If you're looking for a reliable partner, it helps to understand what the best managed WordPress hosting providers offer.
Ultimately, hosting your site locally is one of the smartest decisions you can make. It’s a strategic choice that enhances performance, strengthens security, and frankly, just provides peace of mind.
At LINX Repair Websites, we understand the importance of a seamless, secure, and fast website. If you’re facing migration challenges or need expert help, we’re here for you. Contact us to learn more.