Your WordPress website is the result of countless hours of hard work. The thought of losing it all to a server crash, a stray click, or a security issue is enough to cause a mild panic. But it doesn't have to be that way. Knowing how to backup your WordPress site is like having an insurance policy for your digital presence; it's a simple step that provides incredible peace of mind.
This guide will walk you through the entire process in a clear, friendly way. We'll explore the easiest automated methods using plugins, touch on the more hands-on manual approach, and help you build a backup strategy that lets you sleep soundly at night.
Why You Absolutely Need a WordPress Backup
Before we jump into the "how," let's take a moment to appreciate the "why." Your website is a valuable asset, but it's more fragile than you might think. All it takes is one dodgy plugin update, a server hiccup, or a security breach to wipe out everything you’ve built.
Think of a WordPress backup as less of a chore and more like an "undo" button for your entire website. It’s a complete, restorable snapshot of everything that makes your site tick—your posts, pages, images, themes, plugins, and all the settings you've spent hours tweaking.
The Real-World Risks of Not Having a Backup
It’s tempting to think, "that’ll never happen to me," but the truth is, websites face potential issues all the time. Without a reliable backup, you're taking a big gamble with your business every single day.
Here are just a few common scenarios where a backup is the only thing standing between a minor inconvenience and a total disaster:
- Human Error: We’ve all been there. Accidentally deleting a crucial file or an important page happens more often than we'd like to admit.
- Plugin or Theme Conflicts: Sometimes, a routine update causes a clash with another part of your site, breaking the layout or even taking it offline completely.
- Server Failures: Hosting problems are rare with good providers, but they can lead to data loss that’s entirely out of your hands.
- Security Breaches: Hackers and malware can vandalise your site or steal data, making a clean restore from a backup your fastest route back to normal.
The online threat landscape is always evolving. We're seeing a sharp rise in WordPress vulnerabilities, which really drives home the need for solid backup routines. In 2024, documented vulnerabilities jumped by a staggering 34% compared to 2023, with many tied to plugins and even the core software. This trend puts UK sites at a higher risk, making a reliable backup strategy non-negotiable.
"A backup is your undo button for the entire internet. It transforms a potential disaster that could take your business offline for days into a problem you can solve in minutes."
The Peace of Mind a Backup Provides
Ultimately, knowing how to backup your WordPress site is about giving yourself peace of mind. When you have a recent, clean copy of your site tucked away safely, you can update, experiment, and manage your content with confidence.
Instead of losing sleep over what might go wrong, you can focus your energy on growing your business. It’s a fundamental part of responsible website management. A solid backup strategy is your ultimate safety net. It’s the one thing that guarantees all your hard work is protected, no matter what.
Using Backup Plugins: The Easiest Automated Method
For most people running a WordPress site, a dedicated backup plugin is easily the simplest and most reliable way to protect your work. Think of it as hiring a diligent assistant whose only job is to create perfect copies of your site and store them safely, all on a schedule you decide. This approach completely removes the need for any technical know-how and turns a potentially complex job into a simple, automated process.
But what actually makes a backup plugin good? The real magic isn't just in creating the backup file itself, but in making the entire process seamless and worry-free from start to finish.
What to Look For in a Quality Backup Plugin
When you're trying to figure out how to back up your WordPress site with a plugin, some features are simply non-negotiable. These are the things that separate a basic tool from a genuine safety net for your website.
Here’s what you should always look for:
- Automated Scheduling: The best plugins let you 'set it and forget it'. You should be able to schedule backups to run daily, weekly, or even hourly, depending on how often your site's content changes.
- Cloud Storage Integration: A backup is only useful if it's stored somewhere safe and, crucially, separate from your website's server. Look for plugins that connect effortlessly with services like Google Drive, Dropbox, or Amazon S3.
- One-Click Restore Function: Making a backup is only half the story. When disaster strikes, you need a simple, straightforward way to get your site back online. A one-click restore button can turn a full-blown crisis into a minor inconvenience.
- Complete Backups: A proper backup includes everything: your WordPress files (themes, plugins, uploads) and your database (posts, pages, comments, settings). Double-check that the plugin you choose covers both.
It's hard to overstate how important a solid, automated solution is. Globally, over 90% of all attacks on CMS-based websites target WordPress, and a shocking 77% of sites have vulnerabilities from outdated plugins. With hackers successfully infiltrating over 30,000 WordPress sites every single day, a reliable backup strategy is your first and best line of defence. You can dig into more of these WordPress statistics on Magecomp.com.
A Practical Walkthrough with a Popular Plugin
To make this feel more real, let's walk through the process with a well-regarded plugin, UpdraftPlus. It’s one of the most popular options out there and does a great job of illustrating the key features we’ve just discussed.
This is the main settings dashboard you'll see in UpdraftPlus, which is a pretty common layout for these kinds of tools.

As you can see, it gives you a clear, at-a-glance view of your backup status. You can see the time of the last and next scheduled backups, and it lets you manually create a backup or restore from an existing one with big, easy-to-find buttons.
After installing and activating the plugin, you'd head over to its settings page. The setup usually boils down to two key steps:
- Set Your Schedule: First, you’ll decide how often to back up your files and your database. For a blog that you update once a week, a weekly schedule is probably fine. But for a busy e-commerce site taking orders all day, daily backups are absolutely essential.
- Choose Your Storage: Next, you'll tell the plugin where to send these backup files. It will show you a list of icons for different remote storage options. You simply click on Google Drive, for example, and follow the on-screen prompts to authorise the connection.
Once you’ve done that, the plugin takes over. It will now automatically back up your entire website according to your schedule and send the files to your chosen cloud storage location, all without you having to lift a finger.
A great backup plugin doesn't just create copies; it creates confidence. It lets you run your website knowing that you have a reliable, easily accessible 'undo' button for any situation.
Free vs Premium: What Do You Get for Your Money?
So, how do you choose the right plugin for your site? To help you navigate the options, let's compare three of the most popular choices in the WordPress ecosystem: UpdraftPlus, Jetpack Backups, and Duplicator. Each has its own strengths and is suited for different kinds of users.
Comparing Popular WordPress Backup Plugins
This table breaks down the key features of each plugin to give you a clearer idea of what you get at different price points.
| Feature | UpdraftPlus (Free/Premium) | Jetpack Backups (Premium) | Duplicator (Free/Pro) |
|---|---|---|---|
| Complete Backups | Yes (Files + Database) | Yes (Real-time backups) | Yes (Files + Database) |
| Scheduled Backups | Yes | Yes (Real-time and daily) | Yes (Pro version only) |
| Cloud Storage | Limited in free, extensive in Premium | Jetpack's own secure cloud | Limited in free, extensive in Pro |
| One-Click Restore | Yes | Yes, from any point in time | Yes (Pro version only) |
| Site Migration/Cloning | Yes (Premium add-on) | Not its primary function | Yes, this is its core strength |
| Best For | All-round reliability and flexibility | Hands-off, real-time security | Site migrations and developer use |
For simpler websites, the free version is often more than enough. It typically gives you manual backups and scheduled backups to a few common storage options. It’s a fantastic starting point and infinitely better than having no backup at all.
However, upgrading to a premium version usually unlocks powerful features that are crucial for any business-critical website, like more frequent scheduling, a wider range of storage destinations, and dedicated support. If your website is a hobby, a free plugin might be all you need. But if your site is a source of income or the core of your business, the enhanced features and dedicated support of a premium plugin are a small price to pay for complete peace of mind.
How to Manually Back Up Your Site via cPanel
While plugins are fantastic for their set-and-forget convenience, sometimes you might want or need to take matters into your own hands. Learning how to back up a WordPress site manually gives you a much better feel for how your site is built and puts you in complete control. It’s like learning to change the oil in your car—you might not do it every time, but it’s an empowering skill to have.
This hands-on method, usually done through a hosting control panel like cPanel, isn't nearly as scary as it sounds. The whole job boils down to two key tasks: grabbing a copy of your website's files and exporting its database.
Think of it this way: your WordPress files are the house itself—the walls, the roof, the foundation. The database holds all your stuff inside—the furniture, photos, and personal belongings. For a complete backup, you absolutely need both.
Backing Up Your WordPress Files
First things first, let's secure the 'house'. Your WordPress files are all the bits and pieces that make your site work: your theme, plugins, images, and the core code. The easiest way to get them is by using the File Manager in cPanel to package them into a single file.
- Log in to your hosting account’s cPanel.
- Find the File Manager icon, which is usually in a 'Files' section.
- Once inside, head to your site's root directory. This is almost always a folder called
public_html. - You should see the familiar
wp-admin,wp-content, andwp-includesfolders. Select everything in this directory. - With all files and folders selected, look for a Compress button in the top menu. Choose 'Zip Archive' as the compression type and let it run.
- When it's done, you'll see a new file, probably named something like
public_html.zip. Select that new file and click Download.
Tuck that .zip file away somewhere safe on your computer. That's part one done—you've got a full copy of your site's structure.
Exporting Your WordPress Database
Now for the 'furniture'. The database is where all your content lives—every post, page, user comment, and setting. To grab this, we’ll use a standard database tool called phpMyAdmin.
This part can feel a bit more technical, but it's just a simple export. You don't need to know what every table does; you just need to get a copy of it all in one file.
Don't let the phpMyAdmin interface intimidate you. It looks complex, but for a simple backup, you only need to click one or two buttons. We aren't changing anything, just exporting a copy.
Here's how to pull out your database:
- Head back to your cPanel dashboard and find the phpMyAdmin icon, typically under 'Databases'.
- On the left, you’ll see a list of your databases. Click on the one your WordPress site uses. (If you’re not sure which it is, the name is listed in your
wp-config.phpfile). - With the correct database selected, click the Export tab along the top menu.
- You’ll see two export methods: 'Quick' and 'Custom'. For a standard backup, Quick works perfectly.
- Just make sure the format is set to SQL.
- Click the Export button.
Your browser will download a .sql file, which is the complete snapshot of your database. Save this right alongside the .zip file you downloaded earlier.
This simple graphic shows the flow of a manual backup from start to finish.
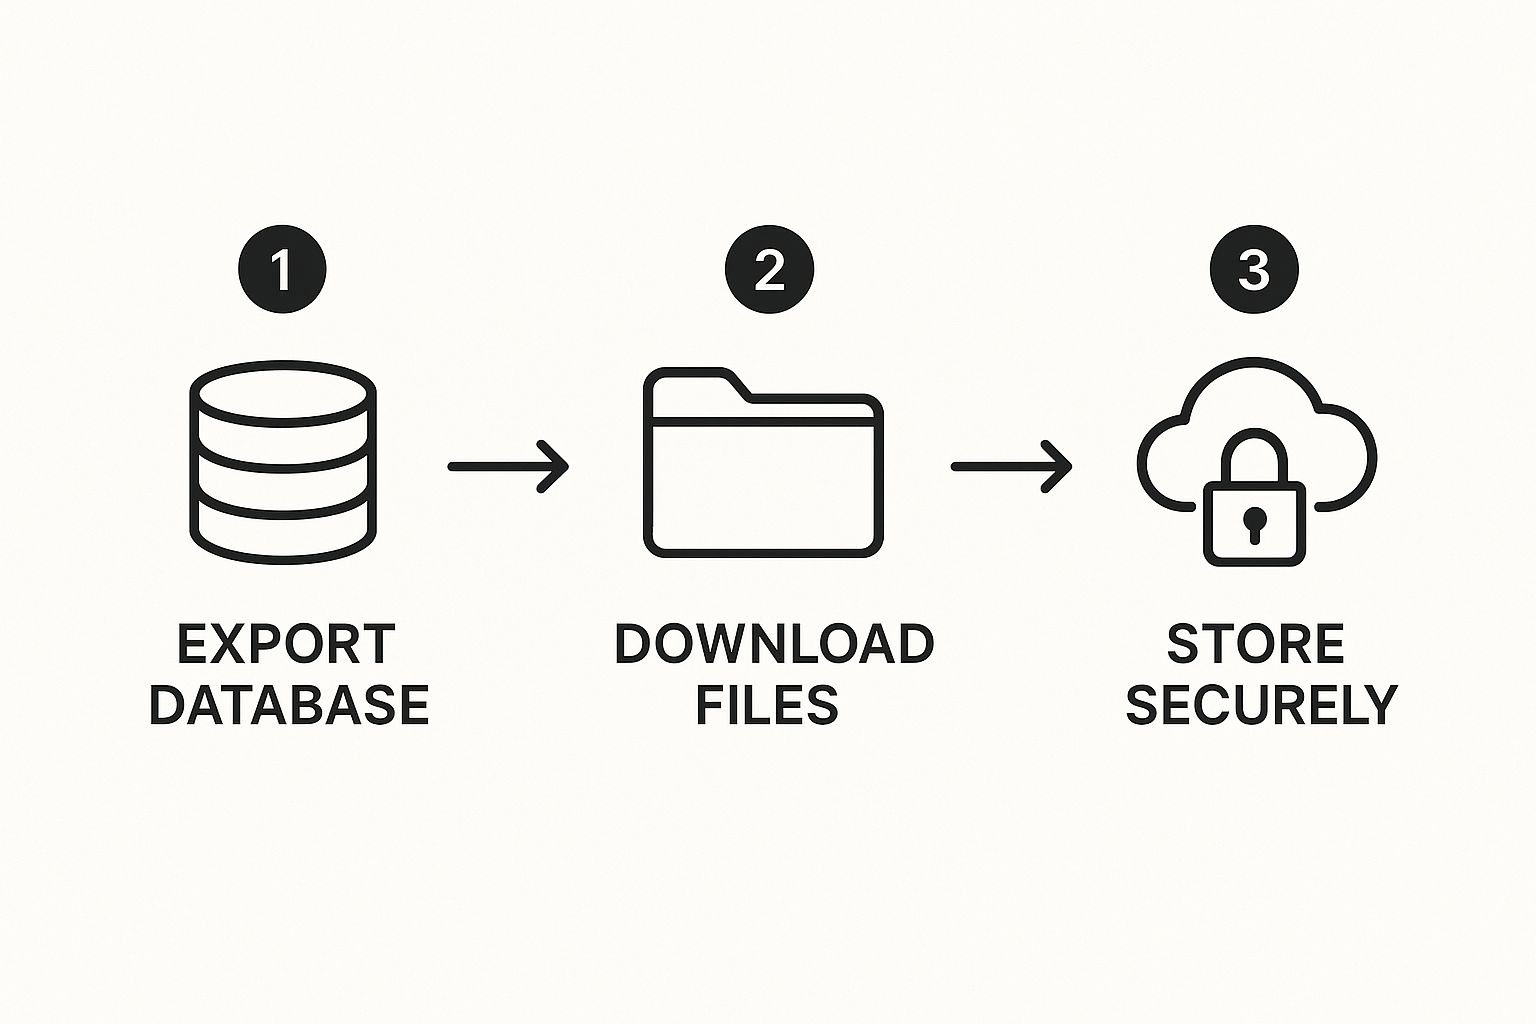
As you can see, it's a logical two-part process: export the database, download the files, and store both components securely somewhere off your server.
Keeping Your Manual Backups Organised
So now you have your two essential pieces: a .zip file with your site structure and a .sql file with all your content.
A great habit to get into is creating a dedicated folder for each backup and naming it with the date, like Website-Backup-2024-10-26. Pop both files inside. This little bit of organisation will save you a massive headache if you ever need to find a specific version to restore.
Doing this every day would be a chore, but knowing how to do it is invaluable. It guarantees that no matter what happens, you have the raw materials to rebuild your site from the ground up.
Should You Rely on Your Hosting Provider's Backups?
It’s always a nice surprise when you realise your hosting provider might already be backing up your website. It feels like a built-in safety net you didn't even know you had. But can you really put all your trust in these host-level backups?
Well, the answer is a classic "it depends." The quality, frequency, and accessibility of these backups vary wildly from one host to another. It's the difference between having your valuables in a high-security vault versus behind a simple padlock.
Managed Hosting vs Shared Hosting Backups
Not all hosting backups are created equal. The type of plan you're on plays a massive role in the kind of protection you're actually getting.
- Managed WordPress Hosting: These premium services often shout about their robust, daily (or even more frequent) backups. It’s a key selling point. They usually give you a slick, user-friendly dashboard to restore your site with a single click, which makes recovery incredibly straightforward.
- Standard Shared Hosting: On the other end of the spectrum, budget-friendly shared hosting plans can have far more basic backup systems. Often, these are designed more for the host's own disaster recovery than for individual customer use. Getting access might mean logging a support ticket, and you’ll likely find they don't run as often.
This distinction is crucial. A managed host's backup is a feature designed for you. A shared host's backup might just be a safety measure designed for them.
The Pros and Cons of Relying on Your Host
Leaning on your hosting provider's solution is tempting because it's so easy, but you need to weigh the convenience against the potential risks.
The Upsides:
- Convenience: It’s completely hands-off. The backups just happen in the background without you needing to install or configure a thing.
- Cost-Effective: This service is usually bundled into your hosting package, so there's no extra expense for another plugin or third-party service.
- Simplicity: Restoring a backup can sometimes be as simple as clicking a button in your hosting control panel.
The Downsides:
- Less Control: You don't get to choose when the backups are taken or how often. This can be a problem if you make significant changes to your site.
- Retention Limits: Your host may only keep backups for 7 or 30 days. If you don't spot an issue within that window, that clean version of your site could be gone for good.
- Potential for a Single Point of Failure: This is the big one. If your hosting provider has a major server-wide catastrophe, both your live site and your backups could become inaccessible at the same time.
A host-level backup is an excellent second line of defence, but it's incredibly risky to make it your only one. The best strategy is always to have your own independent backup stored somewhere completely separate from your web server.
What to Ask Your Hosting Provider
To really get a handle on this, you need to know exactly what your plan includes. Don't be shy about reaching out to your host's support team and asking some direct questions.
Here’s what you need to find out:
- Backup Frequency: How often are backups actually taken? Is it daily, weekly, or something else?
- Data Retention: How long are these backups kept before they're deleted?
- Restore Process: How do I get my site back if something goes wrong? Is it a self-service tool, or do I have to submit a support ticket and wait?
- Restore Costs: Are there any fees for restoring a backup? Some budget hosts charge for this.
- Backup Contents: Does the backup include everything—both my website files and the database?
Getting clear answers to these questions will tell you whether your host's offering is a reliable primary solution or just a helpful fallback. It also highlights why so many experienced site owners supplement with their own backup strategy, avoiding the risk of a complete disaster.
Ultimately, it’s smart to use the services you already pay for. Just make sure you understand their limitations and have a Plan B in place. That way, you're the one in control of your site's security, not your host.
Where to Keep Your Backups (And How to Manage Them)
Creating a WordPress backup is a huge win, but your work isn't quite finished. Where you store that backup is just as crucial as making it in the first place.
Think about it this way: leaving a backup on the same server as your live website is like hiding a spare house key under the doormat. It’s convenient, sure, but it’s also the very first place a troublemaker will look.
If your server crashes or gets hacked, you could lose both your live site and your only backup in one fell swoop. To genuinely safeguard your website, you need a smarter storage strategy that keeps your safety net completely separate from what it’s protecting.
The 3-2-1 Rule: Your Golden Ticket to Data Safety
In the world of data protection, there's a simple, time-tested principle called the 3-2-1 rule. It might sound a bit technical, but the concept is incredibly straightforward and gives you a rock-solid framework for keeping your digital assets safe.
The whole idea is to diversify your risk so that no single catastrophe can wipe out everything. It’s what the pros do, and it’s easy enough for any website owner to implement.
Here’s the breakdown:
- Three Copies: Always have at least three copies of your important data. That means your original live site, plus two backup copies.
- Two Different Media: Store these copies on at least two different types of storage. For example, your web server’s hard drive and a cloud storage service.
- One Off-Site Copy: Make sure at least one of these copies is stored completely off-site, far away from your primary server location.
The 3-2-1 rule isn't just a best practice; it's a mindset. It forces you to think about what could go wrong—server failure, local disaster, cyber attack—and ensures you're prepared for any of them.
Following this approach means that even if your web host has a major meltdown, you still have a secure and accessible copy ready to go.
Practical Places to Store Your Off-Site Backups
So, where should you stash that all-important off-site copy? Luckily, you've got plenty of secure and affordable options, many of which plug right into the backup plugins we've already discussed.
Most decent backup plugins can be configured to automatically send your backup files to these remote destinations, making the whole process hands-off.
Here are some popular and reliable choices:
- Cloud Storage Services: Platforms like Google Drive, Dropbox, and Microsoft OneDrive are fantastic options. They’re a breeze to set up, and chances are you already have an account with one of them.
- Dedicated Backup Storage: For bigger sites or more demanding needs, services like Amazon S3 or Backblaze B2 offer incredibly cheap and scalable storage built specifically for archiving data.
- Your Local Computer: Don't forget the simple stuff! Downloading a recent backup and keeping it on your personal computer or an external hard drive gives you a physical copy that’s entirely under your control.
Choosing one of these ensures your backup is insulated from any issues hitting your website’s server, putting a vital firewall between your safety net and potential disasters.
How Often Should You Back Up Your Site?
With your storage sorted, the final piece of the puzzle is scheduling. There’s no single "right" answer here; it all comes down to how dynamic your website is. The goal is to match your backup schedule to your content update frequency to keep potential data loss to an absolute minimum.
Just ask yourself one simple question: "How much work am I willing to lose?"
- Daily Backups: This is a must for active sites. If you run an e-commerce store taking daily orders, a busy blog publishing multiple posts a day, or a membership site with constant user activity, a daily backup is non-negotiable.
- Weekly Backups: For most standard business websites or blogs that get updated once or twice a week, a weekly backup is usually more than enough. It catches all your latest changes without hogging storage space.
- Real-Time Backups: Some premium plugins and hosting services offer real-time backups, which save changes the moment they happen. This is the ultimate protection for highly transactional sites, like a bustling WooCommerce store where every order counts.
Consistent and thoughtful backup management is a cornerstone of a healthy website. If you'd rather have an expert handle all of this for you, looking into a WordPress website maintenance plan can provide complete peace of mind, covering not just backups but security and updates, too.
Ultimately, a well-managed backup strategy is your guarantee that a website emergency remains a minor inconvenience, not a catastrophe.
Wrapping Up: Your WordPress Backup Plan
We've covered a lot of ground, from the convenience of automated plugins to the control of manual backups. By now, you should feel much more confident about how to backup your WordPress site. It isn't a dark art reserved for developers; it's an accessible and essential task for any responsible website owner.
Let's quickly recap the key takeaways:
- Why Back Up? To protect your hard work from human error, updates gone wrong, server issues, and security threats. It’s your ultimate safety net.
- Easiest Method: Use a reliable backup plugin. It automates the entire process, schedules regular backups, and sends them to a safe, off-site location like Google Drive or Dropbox.
- What Makes a Full Backup? A complete backup must include both your website's files (themes, plugins, uploads) and its database (posts, pages, settings).
- Where to Store Them? Always keep a copy of your backups off-site. Never rely solely on backups stored on the same server as your live website.
- How Often? Match your backup frequency to your content frequency. Daily for active sites, weekly for less dynamic ones.
Putting a solid backup strategy in place is one of the most empowering things you can do for your website. It transforms the fear of "what if?" into the confidence of "I'm prepared." You've invested too much in your online presence to leave it to chance.
Feeling overwhelmed by backups, updates, and security? We understand. If you'd rather focus on your business and leave the technical details to the experts, we can help. Contact us to learn more.